Help
OCAP
Administration
OCAP Introduction
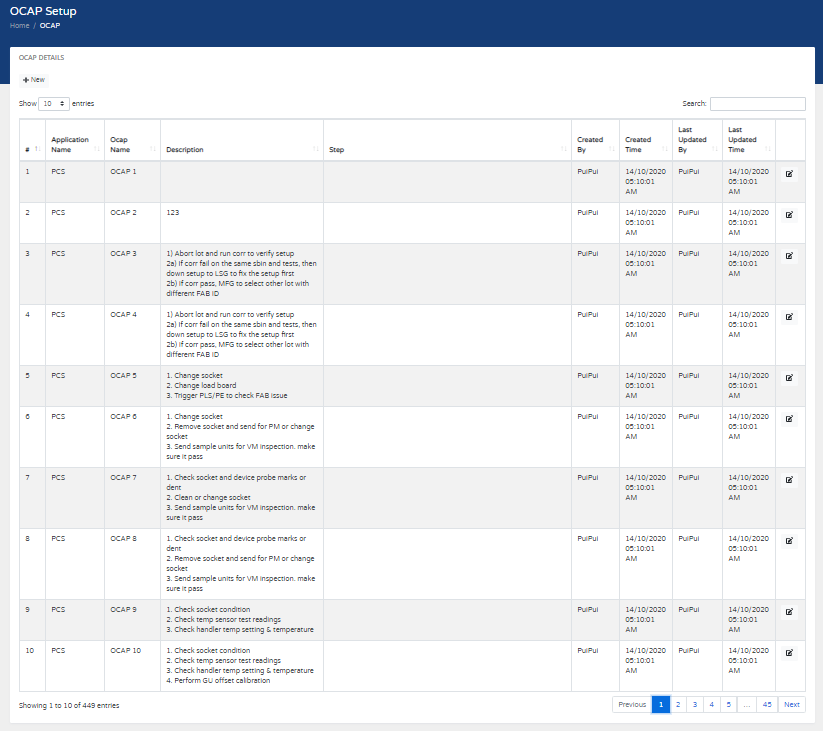
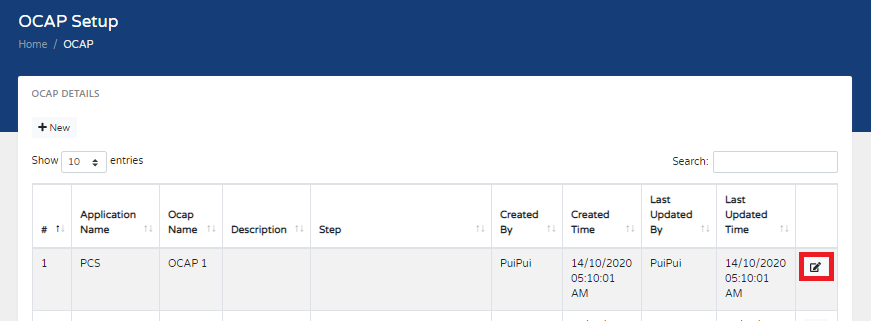
Select on "OCAP" from Navigation Menu to open OCAP Setup Page.
This page mainly lets users configure OCAP settings or view OCAP Settings.

This page mainly lets users configure OCAP settings or view OCAP Settings.
Overview
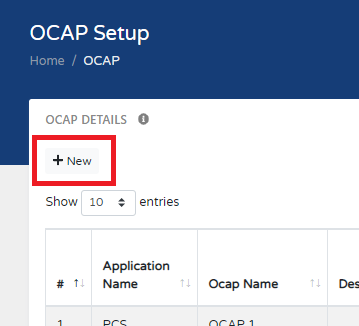
Configure new OCAP
-
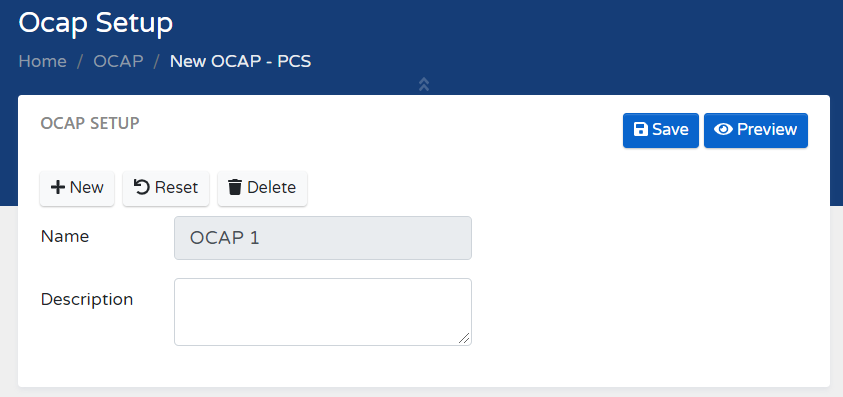
Click on "New" to create New OCAP.
-
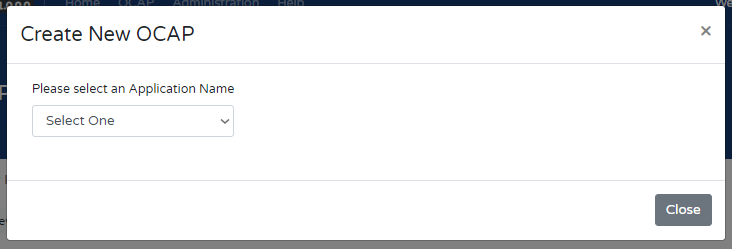
Select an Application Name from the dropdown list.
-
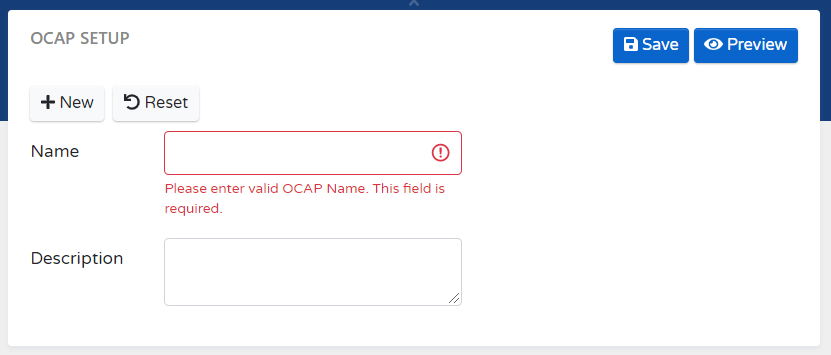
Setup a new OCAP Name.
-
Enter new OCAP name on the textbox.
**[OCAP name field is a compulsory fields.] - Enter description on the textbox.
-
Enter new OCAP name on the textbox.
- Configure OCAP Settings
Edit/Dete/Restore OCAP
-
Click on "Edit" icon to change OCAP settings.
-
Change OCAP Setup.
**[OCAP Name is NOT allow to Change.]- Click on Save button to update ocap.
- Click on Delete button to Delete ocap.
- Click on Restore button to Restore deleted ocap.
- Enter description on the textbox.
- Configure OCAP Settings
Configure OCAP Settings
-
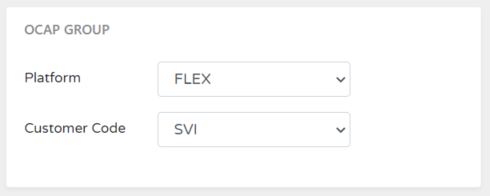
Configure OCAP Group
-
Select OCAP group from dropdown list.
**[It's Optional Fields. You can leave it "Select One" if no OCAP Group.]
-
Select OCAP group from dropdown list.
-
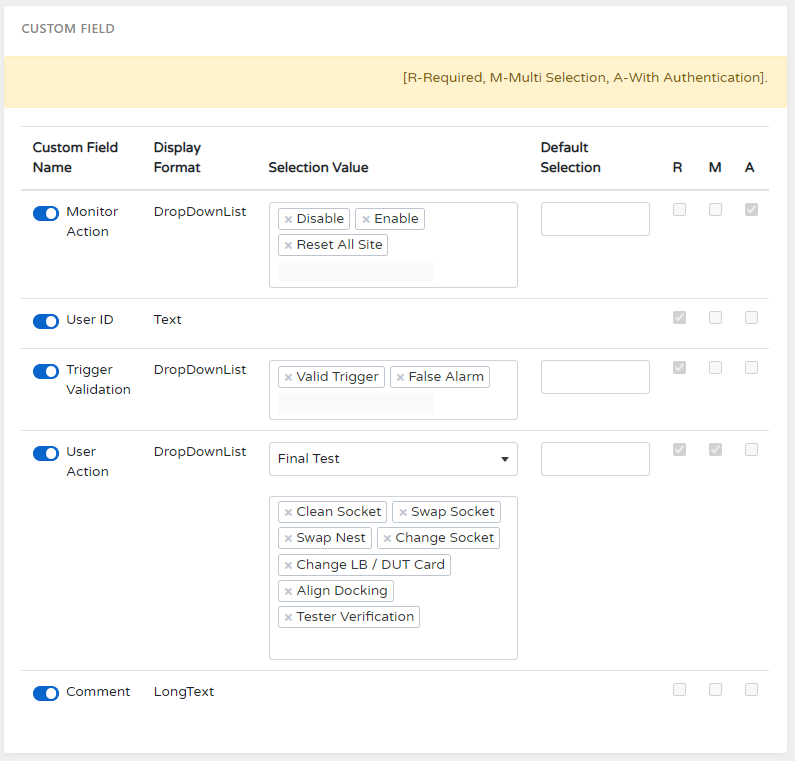
Configure OCAP Custom Fields
-
Turn on / off Custom Field.
-
 Turn on Custom Field. (continue b-d)
-
 Turn off Custom Field.
-
-
If Display Format = DropDownList
- Select Selection Value from the dropdown list.
-
Select Default Selection from the dropdown list.
**[It's Optional Fields. You can leave blank it no default value.]
- Select a Trigger Moment Name from the dropdown list.
-
Check or un-Check special Action needed.
-
R - Check it if it is a require field.
**Applied to below Display Format**
[dropdownlist] - User must select 1 or more value.
[LongText/Textbox] - User must enter value. -
M - Allow user select multiple values.
**Applied to below Display Format**
[dropdownlist] -
A - Need Authentication.
**Applied to below Display Format**
1. [dropdownlist]
2. [Button]
-
R - Check it if it is a require field.
-
Turn on / off Custom Field.
-
Configure OCAP Step
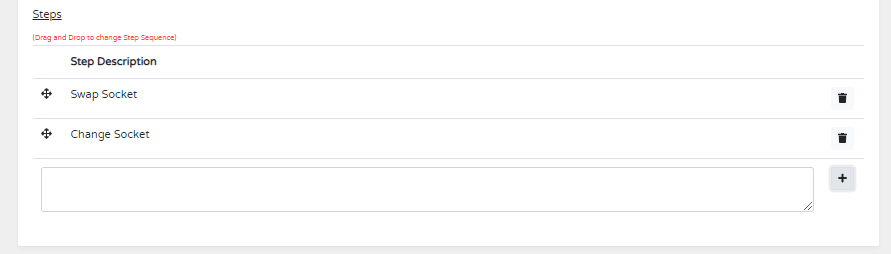
- Enter Step Description on the text box.
- Click on button to Add new Step.
- Click on button to Delete Step.
- Click on row, move up and down to change the step sequence.
- Click on Save button to Save it.
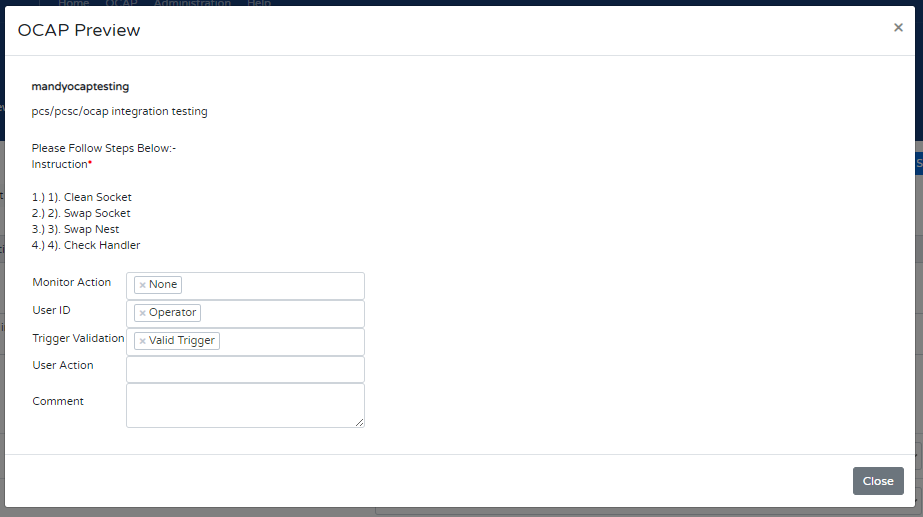
OCAP Preview
-
Click on "Preview" to preview Sample OCAP.

-
Popup a page to show Sample OCAP.
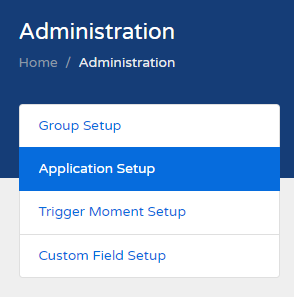
Administration Introduction
Select on "Administration" from Navigation Menu to open Administrion Page.
This page mainly lets users configure Admin settings.

This page mainly lets users configure Admin settings.
Overview
Group Setup
Select on "Group Setup" from Menu to open Group Setup Page.
This page mainly lets users configure Group settings.
This page mainly lets users configure Group settings.
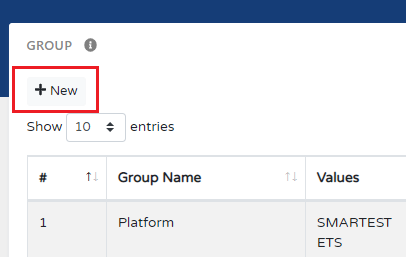
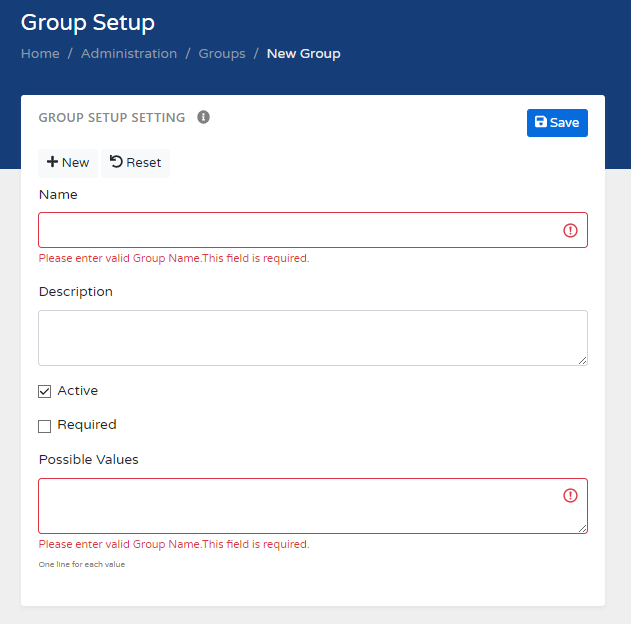
Create New Group
-
Click on "New" to create New Group.
-
Setup a new Group.
-
Enter new Group name on the textbox.
**[Group name field is a compulsory fields.] - Enter description on the textbox.
- Checked Active checkbox.
- If this group is required field please tick it.
-
Enter possible values on the LongTextBox.
**[This field is a compulsory fields. Each Line Each Value]
-
Enter new Group name on the textbox.
- Click on Save button to Save it.
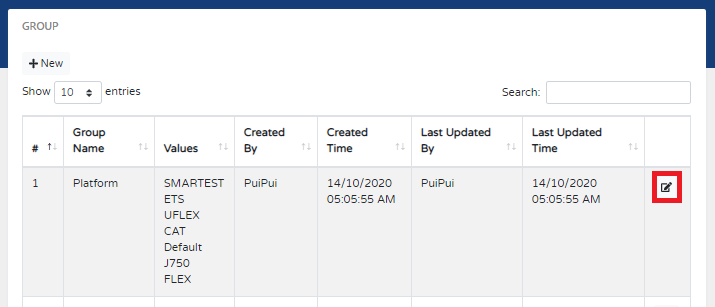
Edit Group
-
Click on "Edit" to create Group setting.
-
Change Group Setting.
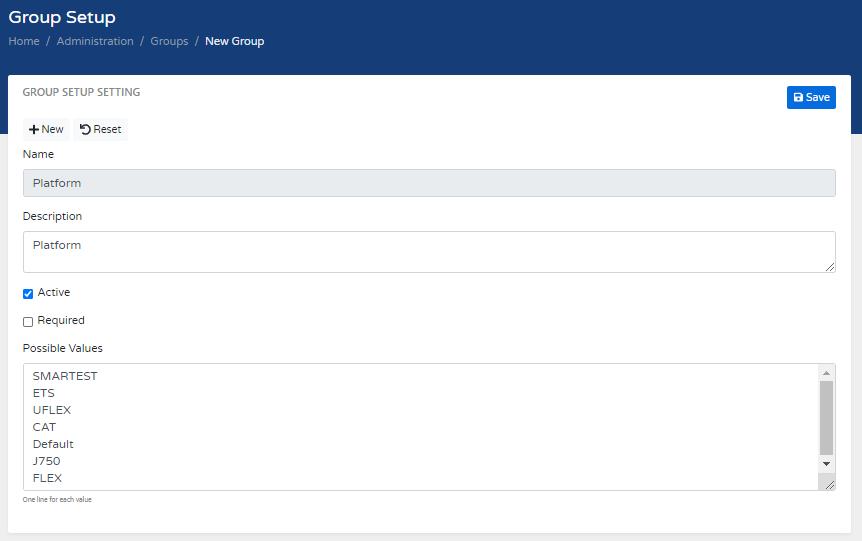
**[Group name is NOT allow to change.]- Enter description on the textbox.
- Un-checked Active checkbox to disable Group. **[ignore this step is this Group is VALID.]
- If this group is required field please tick it.
-
Enter possible values on the LongTextBox.
**[This field is a compulsory fields. Each Line Each Value]
- Click on Save button to Save it.
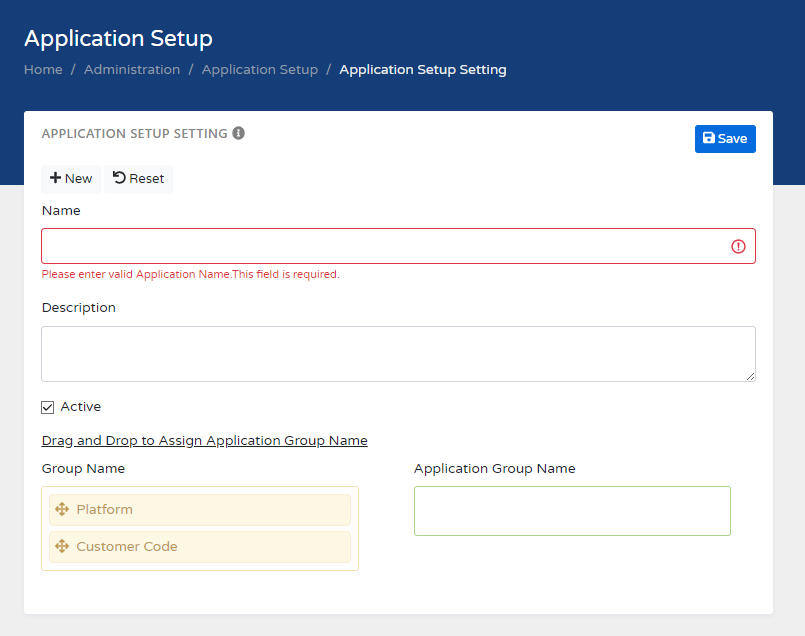
Application Setup
Select on "Application Setup" from Menu to open Application Setup Page.
This page mainly lets users configure Application settings.
This page mainly lets users configure Application settings.
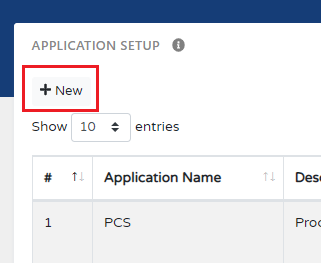
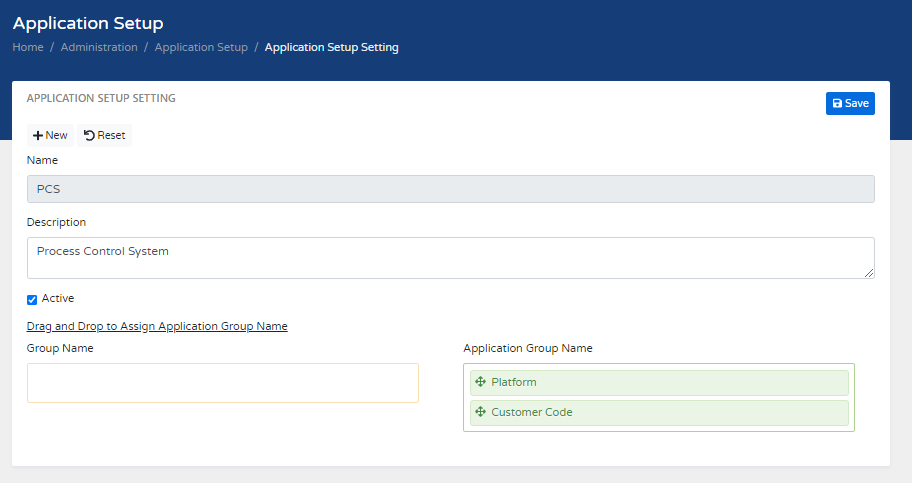
Create New Application
-
Click on "New" to create New Applcation.
-
Setup a new Application.
-
Enter new Application name on the textbox.
**[Application name field is a compulsory fields.] - Enter description on the textbox.
- Checked Active checkbox.
-
Drag and drop to select application group.
**[Drag from left Group box and drop to right Group box]
-
Enter new Application name on the textbox.
- Click on Save button to Save it.
Edit Application Setting
-
Click on "Edit" to create Application setting.
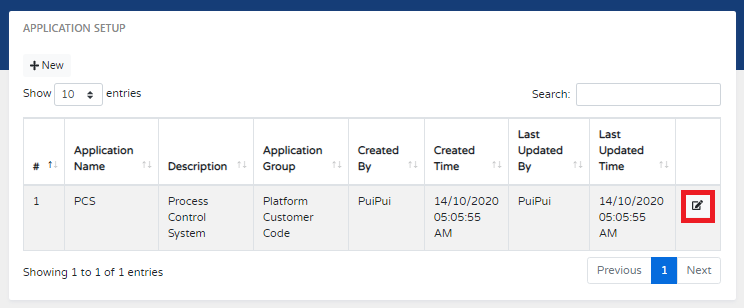
-
Change Application Setting.
**[Application name is NOT allow to change.]- Enter description on the textbox.
- Un-checked Active checkbox to disable application. **[ignore this step is current application is VALID.]
-
Drag and drop to select application group.
**[Drag from left Group box and drop to right Group box]
- Click on Save button to Save it.
Trigger Moment Setup
Select on "Trigger Moment Setup" from Menu to open Trigger Moment Setup Page.
This page mainly lets users configure Trigger Moment settings.

This page mainly lets users configure Trigger Moment settings.
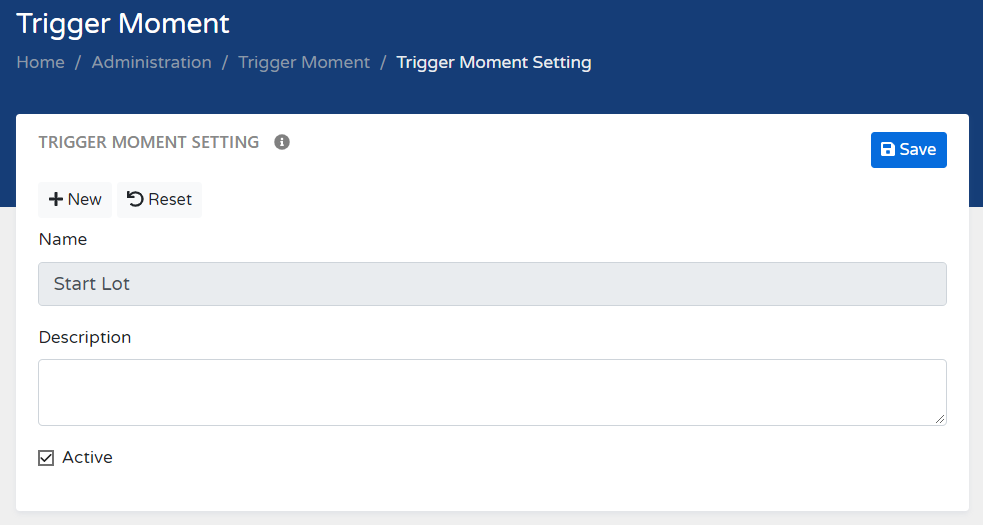
Create New Trigger Moment
-
Click on "New" to create New Trigger Moment.
-
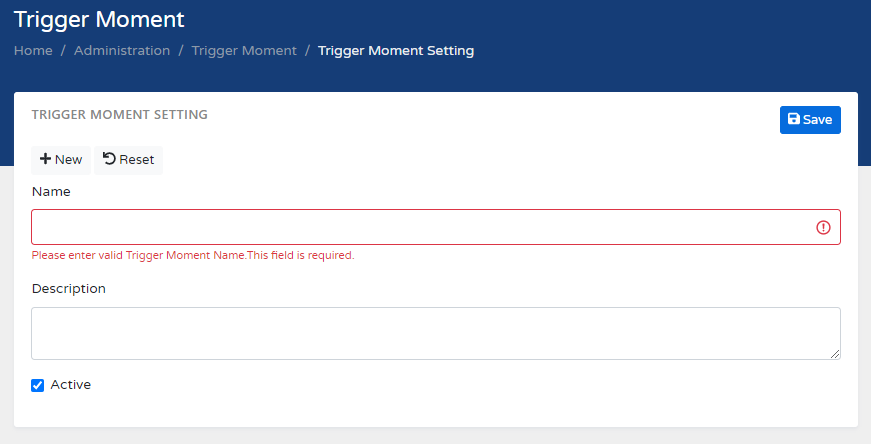
Setup a new Trigger Moment.
-
Enter new Trigger Moment name on the textbox.
**[Trigger Moment name field is a compulsory fields.] - Enter description on the textbox.
- Checked Active checkbox.
-
Enter new Trigger Moment name on the textbox.
- Click on Save button to Save it.
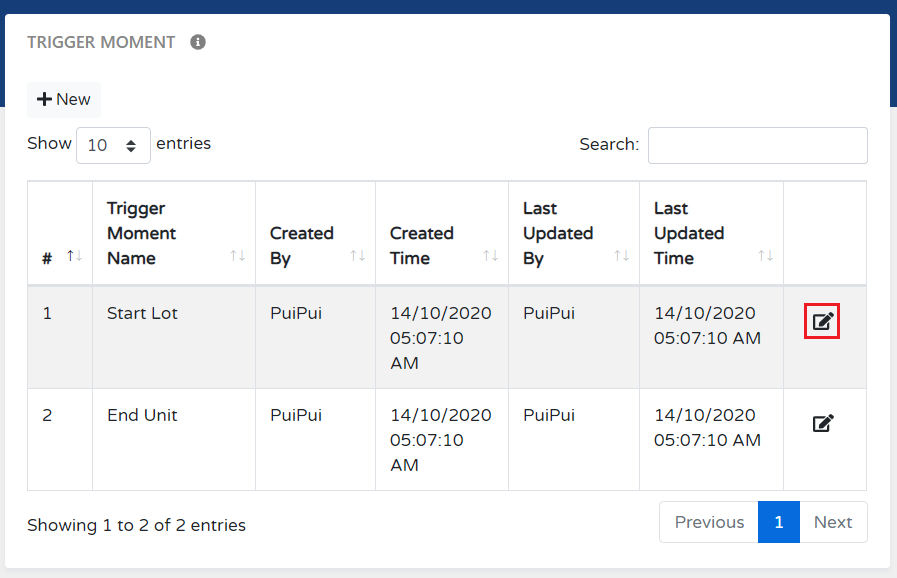
Edit Trigger Moment
-
Click on "Edit" to create Trigger Moment setting.
-
Change Trigger Moment Setting.
**[Trigger Moment name is NOT allow to change.]- Enter description on the textbox.
- Un-checked Active checkbox to disable Trigger Moment. **[ignore this step is Current Trigger Moment is VALID.]
- Click on Save button to Save it.
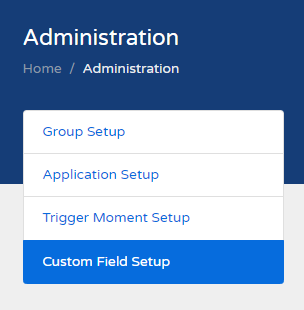
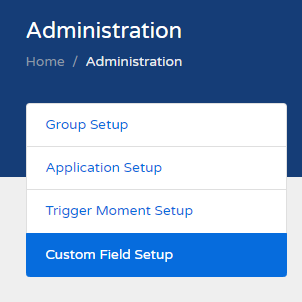
Custom Field Setup
Select on "Custom Field Setup" from Menu to open Custom Field Setup Page.
This page mainly lets users configure Custom Field settings.
This page mainly lets users configure Custom Field settings.
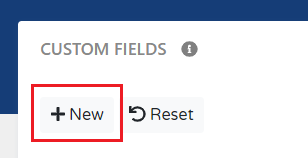
Create New Custom Field
-
Click on "New" to create New Custom Field.
-
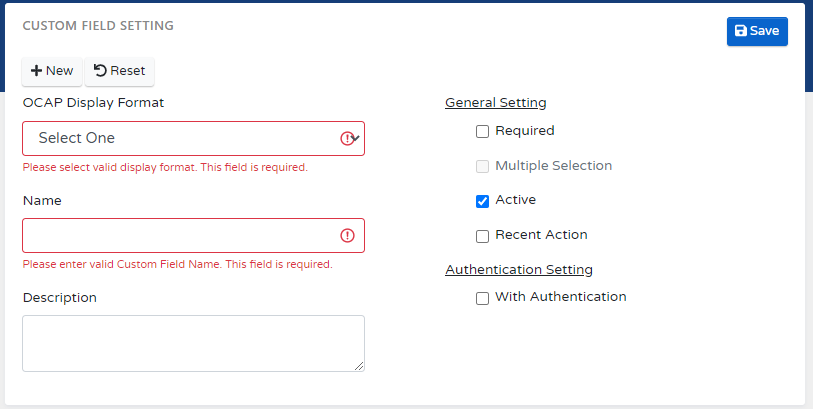
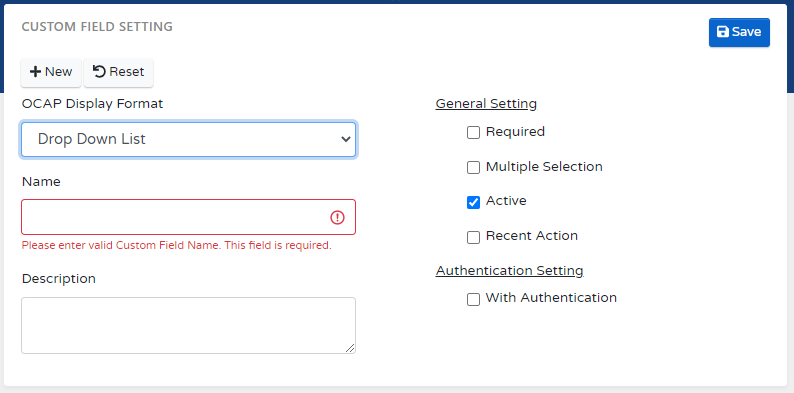
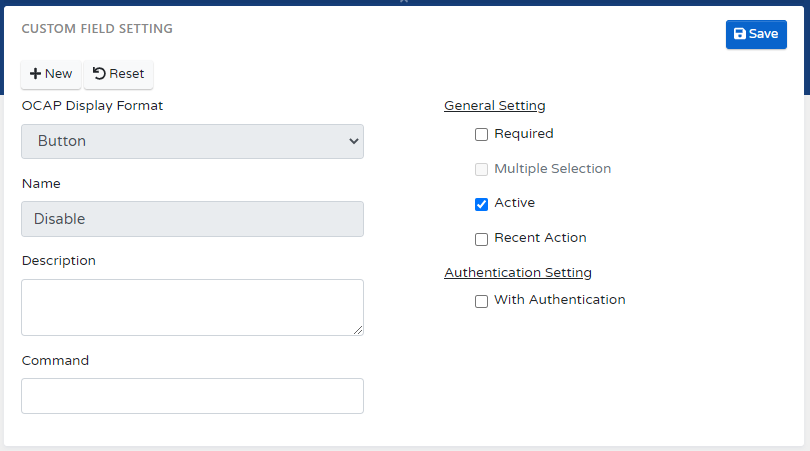
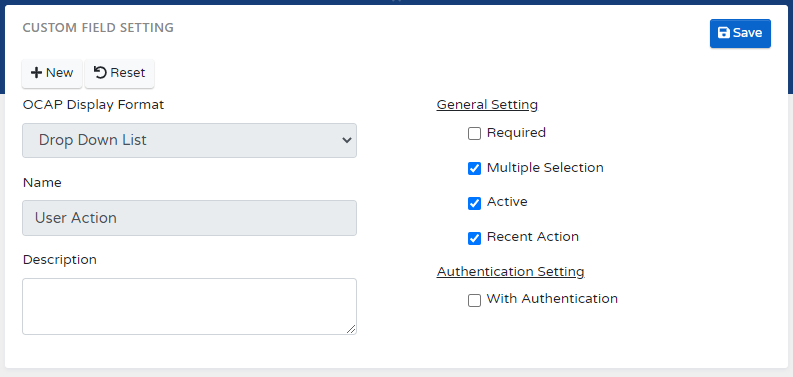
Setup a new Custom Field.
-
Select display format from DropDownList.
**[Display Format field is a compulsory fields.] -
Enter new Custom Field name on the textbox.
**[Custom Field name field is a compulsory fields.] - Enter description on the textbox.
-
Display Format Setting
-
Button

- Enter command on command textbox.
-
DropDown List
Possible Value
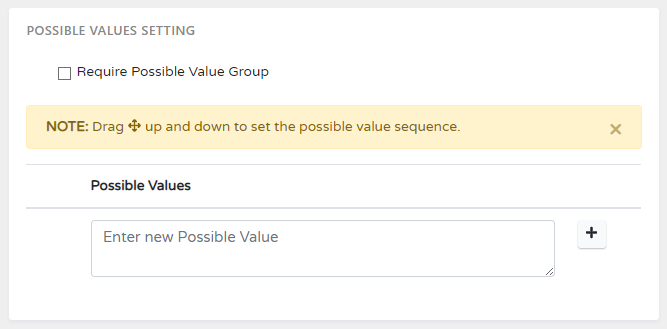
- Enter Possible Value on the textbox.
- Click button to add new possible value.
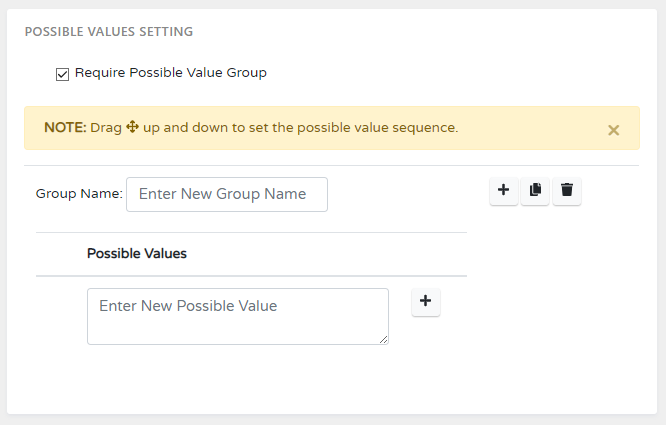
- Checked Require Possible Value Group.
- Enter Possible Value Group
- Setup Possible Value
- Click on button to add new group
- Click on button to duplicate a new group
-
Button
-
Check or un-check Generat Setting checkbox
- Required - Check it if current custom field is required field.
- Multiple Selection - Check it if require multiple selection. [only apply to DropDown List display format]
- Active - Check it if current custom field is active.
- Recent Action - Check it if current custom field need to return last recent action
- Check Authentication check box if need authentication
-
Select display format from DropDownList.
- Click on Save button to Save it.
Edit Custom Field
-
Click on "Edit" to create Custom Field setting.
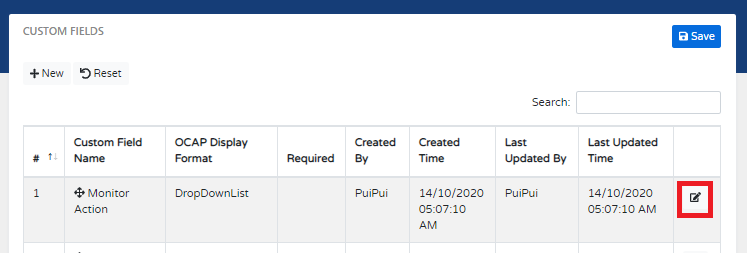
-
Change Custom Field Setting.
- Enter description on the textbox.
-
Change Custom Field Content Base On Display Format Setting
-
Button
- Enter command on command textbox.
- Enter command on description textbox.
-
DropDown List
Possible Value

- Enter Possible Value at textbox
- Press button to add new possible value.
- Press the bin button to remove possible value.
Possible Value With Group
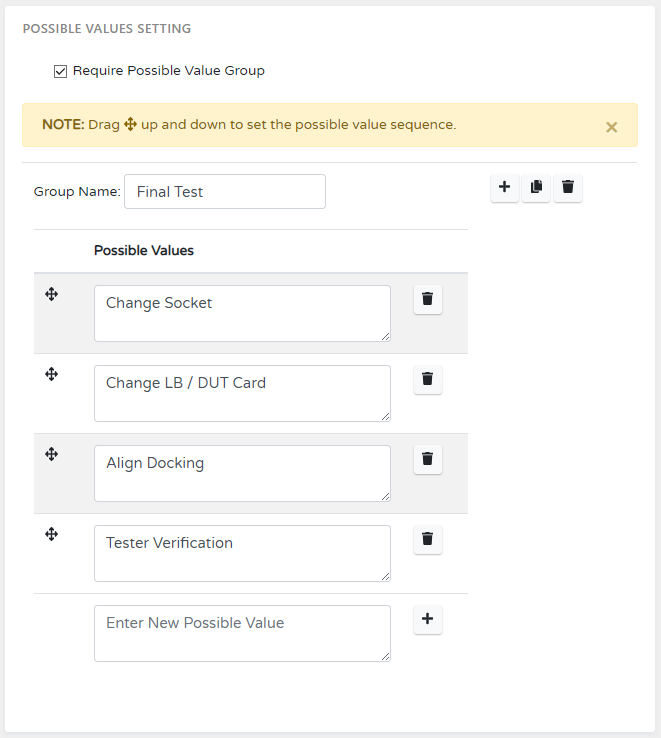
- Press button to add new Possible Value Group
- Enter Possible Value Group Name
-
Setup up possible value
- Enter Possible Value at textbox
- Press button to add new Possible Value.
- Press the button to remove possible value.
- Press the bin button to remove Possible Value Group
-
Button
-
Check or un-check Generat Setting checkbox
- Required - Check it if current custom field is required field.
- Multiple Selection - Check it if require multiple selection. [only apply to DropDown List display format]
- Active - Check it if current custom field is active.
- Recent Action - Check it if current custom field need to return last recent action
- Check Authentication check box if need authentication
- Click on Save button to Save it.
Change Custom Field Display Sequence
Change Custom Field display Sequence,
this sequence will take effect when display at OCAP Setup Page
and customer screen.
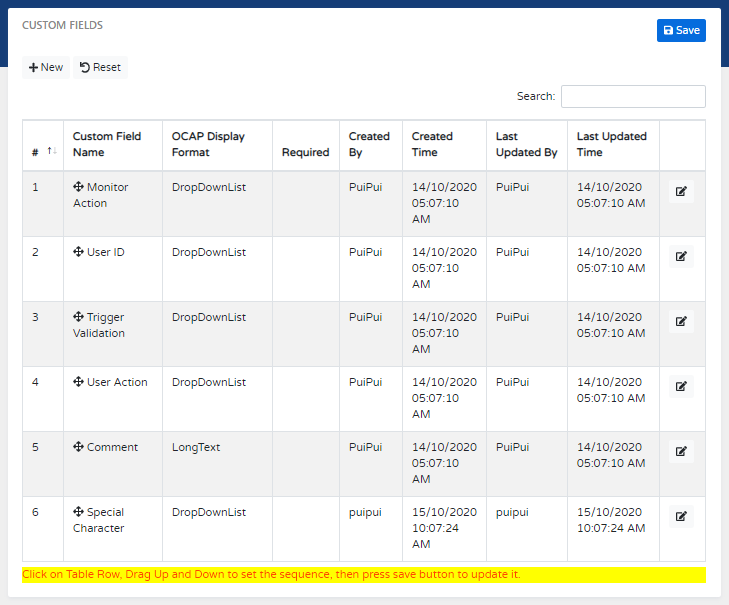
- click on the table row drag up and down to change the sequence.
- Click on Save button Save it.